

How To Make Address Label Template
Template Tuesday Presents...how to create label templates in Word using Create Labels & Insert Table tools.
(Visiting from America? Cheque out our guide to creating label templates for American label sizes.)
How To Create A Label Template In Word Using Create Labels
With "Create Labels", y'all enter the measurements of your sheet labels and the tool automatically creates a suitable label template. Y'all volition need the following measurements:
- Folio Size (and Orientation)
- Page Margins (Top Margin and Left Margin)
- Label Height and Width
- Vertical Pitch and Horizontal Pitch
- Number of Labels Per Row (Across) and Per Column (Down)
To showtime the Create Labels tool, open up a new blank document in Give-and-take. Click on the Mailings tab and select Labels (on the left paw side). This opens a dialogue box called Envelopes and Labels. To create a template:
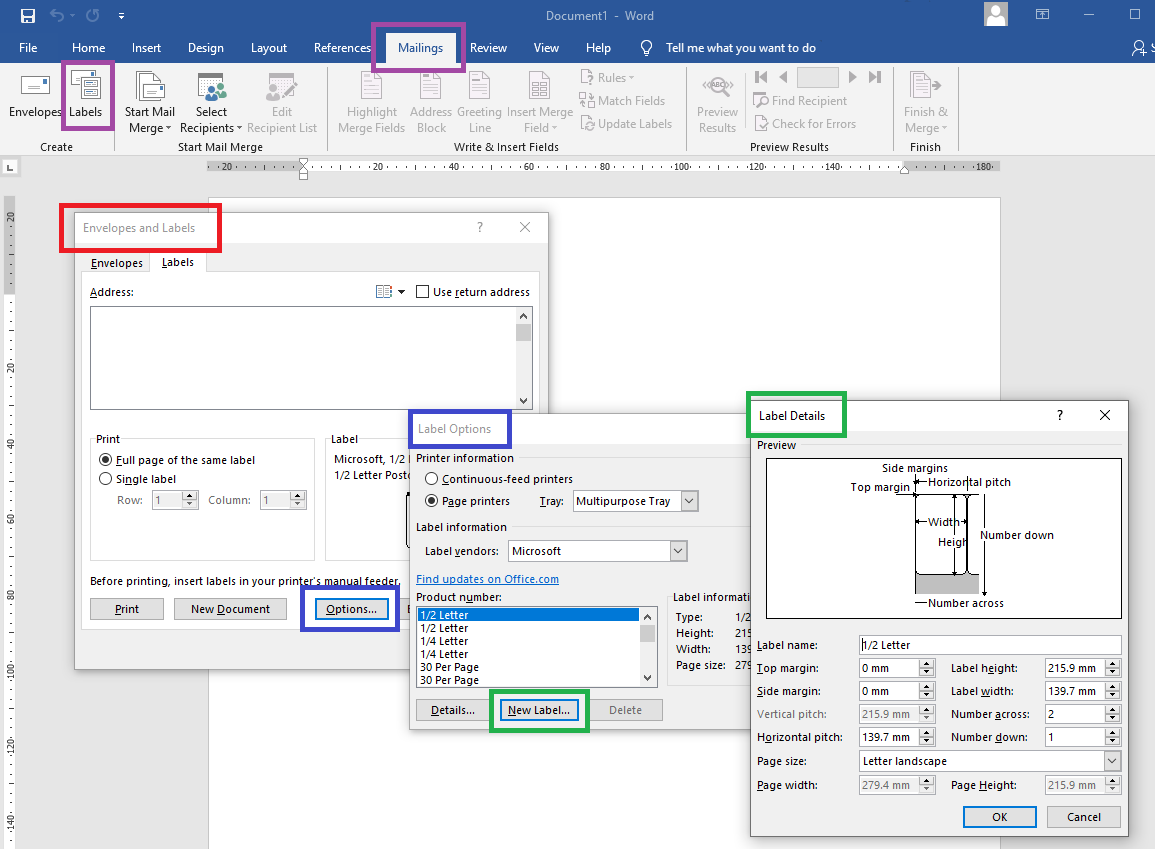
Step one: Click on Options; this opens a dialogue box called Label Options.
Pace 2: Click on New Label; this opens a dialogue box chosen Characterization Details.
Step iii: Enter your required measurements. We recommend using this lodge:
- Page Size (& Orientation) – A4 is 210mm by 297mm.
- Labels Across & Labels Down – number of labels in each row and column.
- Label Width & Height – for round labels, enter the bore into both fields.
- Vertical Pitch & Horizontal Pitch – these are label elevation plus row gap height and label width plus column gap width respectively. If there are no gaps enter just the label height or width.
- Top Margin & Side (Left) Margin – if Word takes result with the measurements you've provided so far, prepare all the margins to 0mm, enter your other measurements again, and then add in your margins.
Step 4: Give your template a name, and click OK. This returns you to Label Options.
Step v: Click on OK; this returns y'all to Envelopes and Labels.
Step six: Click on New Document; this opens a new document containing your template.
Template Tuesday Acme Tips For Using The Create Labels Tool
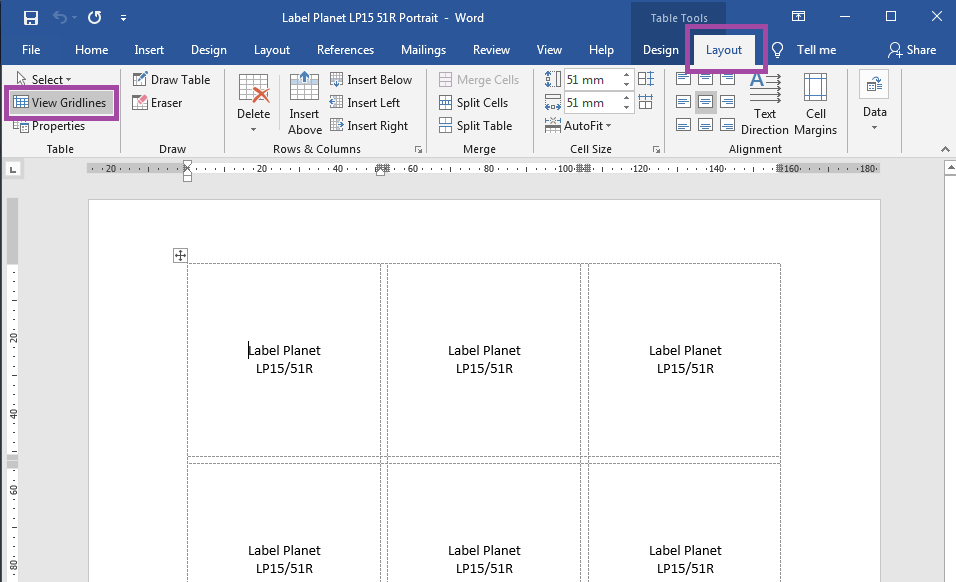
- Word templates represent canvass labels using a table. Each prison cell represents a label (or a gap between labels). They can only represent labels as a grid of rectangles and/or squares; they cannot prove any shaping, including oval and round labels or rounded corners on rectangle and square labels.
- The table is borderless so information technology doesn't get printed forth with your designs. Its outlines will be shown every bit dotted grey lines. If y'all cannot run across the tabular array, Table Gridlines are turned off. Left click one time anywhere in the heart of the page to bring upwards the Table Tools Layout tab at the superlative of the folio. Click on the View Gridlines push button on the left hand side.
- Enter your measurements (except number across/downward) as a value, followed past a unmarried blank infinite, followed by the measurement unit symbol. For instance: "70 mm".
- Word uses centimetres past default. Characterization measurements tend to apply millimetres. Y'all can stick with centimetres (and convert the measurements) or modify Word's measurements to millimetres.
Word: Click on File, Options, and Avant-garde. Gyre to Display and fix "Show Measurements in units of" to millimetres.
Give-and-take For Mac: Click on "Word" in the menu bar and select "Preferences". Select "General" from Authoring & Proofing Tools, and set "Measurement units" to millimetres. - After creating your template, save a copy before calculation your pattern.
How To Create A Characterization Template In Word Using Insert Tabular array
Equally Word templates are basically tables, you tin can just create a tabular array that replicates your labels. Y'all will need the same measurements as above BUT you lot will demand row gap heights and column gap widths (rather than vertical and horizontal pitches) and all four page margins. At that place are 2 stages: creating a suitable starting certificate and adding a suitable table.
Create A Suitable Starting Document
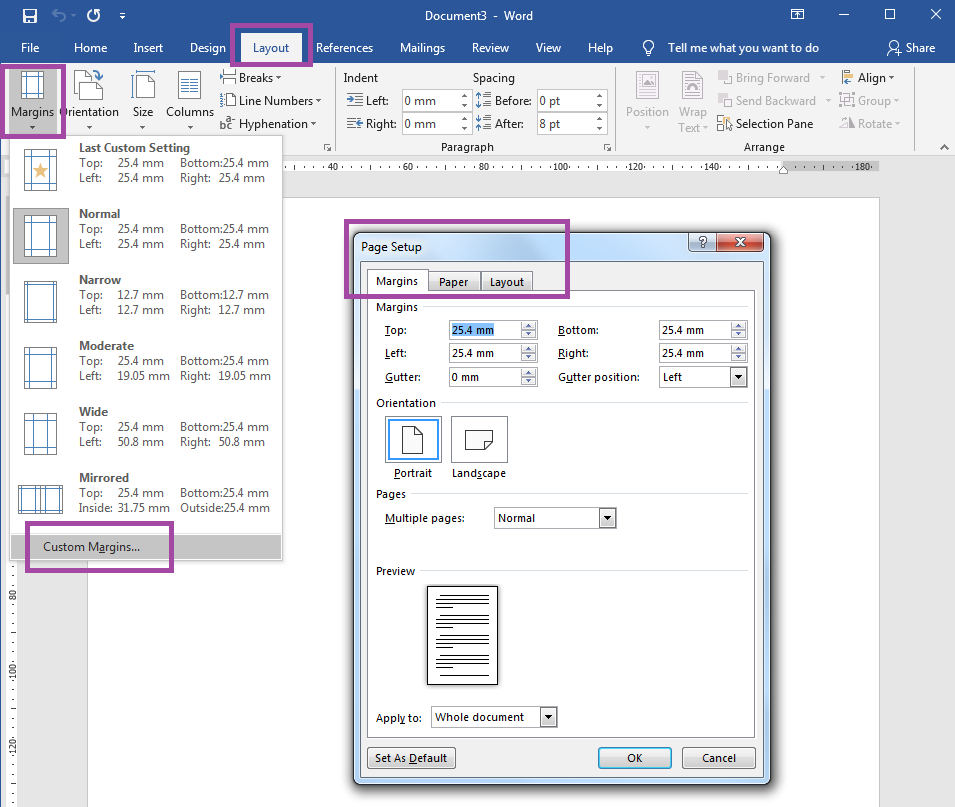
- Open up a new blank document in Discussion. This creates a portrait A4 page. To create a landscape template, click on the Layout tab, then on Orientation, and select Landscape.
- Adjacent you need to enter the correct measurements and margins for your folio. Click on the Margins option in the Layout tab and select Custom Margins. This will open up a Page Setup dialogue box.
- On the Margins tab, enter your summit, bottom, left, and right folio margins and set the gutter margin to 0mm.
- On the Paper tab, check that the page size is A4 with the measurements 210mm and 297mm.
- Finally, on the Layout tab, prepare the header and footer to 0mm. Click OK to make your changes.
Discussion may now warn yous that your margins are "exterior the printable expanse". You can ignore this warning. If Word splits your tabular array onto two pages (or adds a blank page), fix the bottom margin to 0mm.
Add together A Suitable Tabular array
- Click on the Insert tab at the top of the folio. Select Tabular array and Insert Table.
- Enter the number of rows and columns you demand and press OK.
- If there are no gaps between your labels, enter the number of rows and columns.
- If there are gaps, you can stand for them with additional blank rows and columns OR comprise them into the rows and columns that represent their own rows and columns where possible. And then, for example, if y'all take three columns with gaps, you lot need a table with five columns (3 representing the labels themselves and two representing the gaps).
Editing Your Table
This adds a generic table; it needs alteration to create a suitable template. Move your cursor to the height left corner of the table and left click on the four headed pointer icon that appears to select the table. Brand these changes:
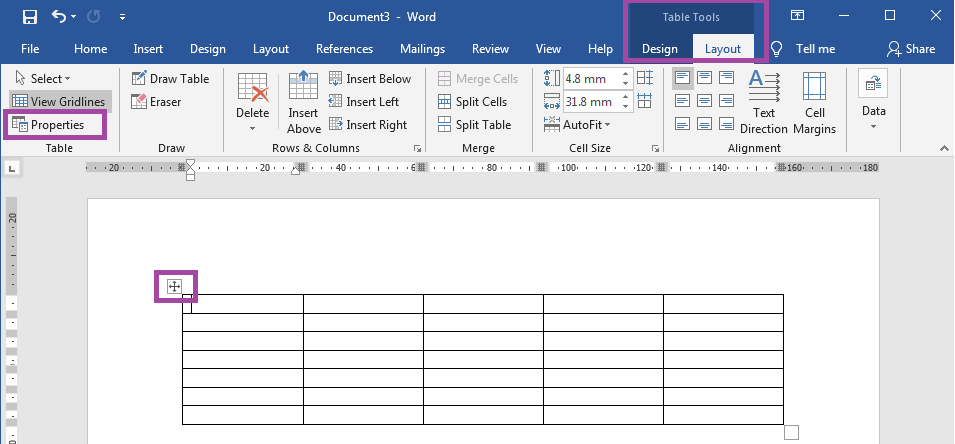
- Remove Borders; select the Table Tools Design tab, click on Borders, and select No Borders.
- Set Table Properties; select the Table Tools Layout tab and click on the Properties push button. Click on the Table tab. Nether size, gear up the preferred width to the total width of your labels (i.e. from the left edge of the first column to the correct edge of the terminal column). Nether alignment, select "Center". Click on Options, fix cell margins and spacing to 0mm, and plow off "automatically resize to fit contents".
- Set Row Backdrop; click on the Row tab in Table Properties. Under size, enter your label summit and prepare it to "Exact" (Non "At least"). Nether options, deselect both options. If in that location are gaps, utilise "Next Row" to change each row height as needed.
- Set Cavalcade Properties; click on the Column tab in Table Backdrop. Nether size, enter your label width. If there are gaps, apply "Side by side Cavalcade" to change each column width equally needed.
- Set Cell Properties; click on the Cell tab in Table Properties. We recommend a centralised alignment but this depends on your characterization design. Under options, set cell margins to "Same as the whole table", select "Wrap text", and deselect "Fit text".
- Centralise Table; click on the Table Tools Layout tab and select the centre icon in the set of nine alignment options.
Finally, we recommend saving a copy of your blank label template before adding your design.
Next Week On Template Tuesday: Disharmonize Resolution – How To Make Sure Your Software & Your Template Are Uniform

How To Make Address Label Template,
Source: https://www.labelplanet.co.uk/how-to/templates-news/how-to-create-label-templates-word/
Posted by: ellenderbeely1967.blogspot.com
0 Response to "How To Make Address Label Template"
Post a Comment